| Isolation (Sprinting) Drills |
Tuesday, August 30, 2011


Monday, August 29, 2011
How To Improve Sprinting Speed
Improving Your Sprinting Speed
– do not force yourself to stay low
The drive phase happens right after you react to the starting gun. Your initial 8-10 steps is
considered your ‘drive phase’. The biggest problem seen with athletes in the drive phase is that
they know that staying low will create better exit angles to set-up the ideal acceleration phase. The problem is that athletes are ‘trying’ to stay low.
When athletes try to stay low they normally hold themselves down by breaking at the hips. This
will limit the amount of force you can apply to the ground and leads to poor acceleration. Let your upper body unfold naturally. You want to keep a straight line from your back ankle all the way to your head. Staying low will occur naturally if you are already strong enough.
Acceleration phase
Since the acceleration phase (0-30 yards) is associated with a higher stride frequency then at
maximum speed, athletes are concerning themselves too much trying to be quick with their legs.
So, instead of trying to drive out and be powerful, athletes are ‘spinning their wheels’.
Make sure when you are running the 40 that you getting triple extension (ankle, knee, hip) and that you ‘feel your feet behind you’. If you are getting the sensation of your feet driving well behind your centre of mass, then you know you are finishing off your leg drive to be as powerful as possible. If you try to be too quick with your legs, you will not be using your full strength to drive out and, although you might feel a little faster because your legs are moving quicker, you will actually have a slower time and not set yourself up to be in the best possible position.
Relaxation
One of the hardest things about running is trying to stay relaxed while you run. Most athletes first think that, in order to run fast, that they have to run hard. They associate running hard with trying to create as much tension as possible. You can tell easily if an athlete is too tense, just by looking at their facial expression. If you see an athlete with a tight face, their eyes will be squinting, teeth are mashed, and you know that they are trying too hard and are forcing themselves to be slow down. If you see an athlete with their cheeks flopping up and down as they run, you know that they have mastered the relaxation technique and are getting the most out their sprinting. I remember sprint coach guru Charlie Francis saying that you must ‘let the speed come’. You have to let your muscles work for you and not against to maximise your speed potential. This is a tough concept to learn and must be practised if we want to get the most out of our speed. Other things to look for if you are running tight are clenched fists, elevated shoulders and a shortened stride.
Arm action
The arms play a significant, yet overlooked, role in sprinting and speed development. Without
specifically and regularly addressing proper arm mechanics within your speed training programme, full speed potential will not be realised. Today we will address this issue so that we can continue to make improvements on the athletic field.
The role of the arms is to stabilise the torso so that power can continue to be efficiently transferred through the hips. It is this ability to transfer power effectively through the centre of mass that not only improves rate of acceleration, but also facilitates reaching maximum velocity, maintaining those top speeds and reducing the rate of deceleration. So, as you can see, the arms both directly and indirectly influence the ability to run fast.
Now let us get into the specifics of improving our arm action. When running, it is very important to keep your hands relaxed. Think about holding a potato chip in each hand. No matter how hard you run, no matter how tired you get, you cannot clench your hands so that the potato chip breaks. This is a good way of thinking about how loose your hands should be at all times when running. When you start to clench your fists tightly, that tightness spreads through your forearms, biceps, shoulders, neck and face. Once you tighten up and lose range of motion in your arms, it reduces stride length, which is difficult to get back without burning a lot of energy.
While sprinting, it is important to get a full range of motion with the arms. Remember, speed is a
product of stride length and stride frequency. Stride length and frequency are determined, in part, by the motion of the arms. If you are lazy or passive with your arm action, you are limiting your potential for speed. Your front arm angle should be between 60-90 degrees at the elbow and your back arm should be between 90-120 degrees, also at the elbow. If your arm angles fall outside of this range, your running mechanics will be negatively affected. In short, you will run slower and get tired faster.
When running, arm swing should be initiated at and through the shoulders. You should think of
your elbow as being locked in place. Elbow angle should only change slightly, as a result of elastic response. Range of motion with the arms should generally be hip to cheek. That is, the hand clears the hip in the back and comes up to about cheek height in front. Much more than that, in either direction, will result in over striding which, as mentioned before, will cause breaking and can lead to strains, pulls and tears in the muscle.
When running, emphasis should be placed on driving the elbows down and back. When runners
fire their arms straight back, without first driving them down, it often leads to bunched up
shoulders, which causes tightness and limits range of motion. It is important to focus on driving the arms back as they are recovered elastically by the stretch of muscles in the shoulder. So, do not drive your arms up and forward because stretch reflex is going to bring them forward anyway.
Another aspect of arm action is to avoid lateral deviation beyond the sagittal plane. What this
means is that your arms, when they are brought in front of you, should never cross the midline of
your body. Your right arm should stay on the right half of your body and your left arm should stay on the left side.
When you move your arms laterally, across the midline of your body, you rotate your hips, which
basically burns much needed energy and makes you run slower and get tired faster, all for no
reason other than laziness and lack of concentration.
Remember, you compete like you practise, so, if you do not correct technical issues in practice,
you cannot expect them to be fixed in competition.
Think of some example exercises.
This drill can be practised either in a group setting, or alone by standing in front of mirror.
Stand with the feet between hip and shoulder width apart. Bring your weight forward onto the balls of the feet. You should be far enough forward that your heels are slightly off the ground, but not so far forward that your toes curl to maintain balance. It is this slight, two to four degree lean that is ideal for simulating sprinting.
Start with one arm forward, 90 degrees at the elbow and one arm back, also 90 degrees at the
elbow.
Perform this drill following the guidelines presented in this article:
• Arm action at 50% intensity.
• 2 sets of 30 seconds.
• 15 second rest between sets.
• Arm action at 80% intensity.
• 2 sets of 20 seconds.
• 20 seconds rest between sets.
• Arm action at 100% intensity.
• 4-5 sets of 10 seconds.
• 25-30 seconds rest between sets.
Mastering proper arm action is simply a function of knowing what to do and then repeating the
proper pattern until muscle memory makes it the new natural pattern.
Hands – open versus closed
Cueing the hands can be a touchy subject. Some coaches believe that having your hands open is
the best way, while others like a closed hand for their athletes to use while running.
First, I would look at the athlete. If they look as if their shoulders/arms are staying relaxed, and are not crossing the midline, then you should not cue this athlete too much with hand technique. Thereare so many other cues and techniques to work on then to worry about their hands if they do not seem to be causing a problem.
If your athlete is not staying relaxed in their arms and shoulders then I would address their hands.
Usually, if the hands are wide open with the fingers and palms straight, the forearm tends to be
flexed. This causes tension of the arm and the upper arm and shoulders, and, as you know, this
can affect the elasticity of your muscles, causing you to fight yourself as you move. The same
thing can happen when you make a fist and try to run. Holding your hands clenched, causes your
forearms to be tight and you will run into the same problem as the ‘open’ hand.
I teach in between both of these. You want your hands to stay relaxed. I am sure you have heard
this saying before – to ‘pretend you are holding a potato chip in your hand and you do not want to break it’. You can actually feel your fingers almost bouncing up and down as your run. This is the type of relaxation that should carry to the rest of your arm up to your shoulder. Keep the hands loose, but not open.
Another thing to note is that, looking at the top receivers and defensive backs, they never run with closed hands because they want their hands to be as soft as possible to catch a ball. If their hands are closed, their arms will be tight and it will take more time to open them and create the soft hands that they are looking for.
Stride length
We touched a little on stride frequency, now let us get into stride length. Your optimal stride length should be about 2.5-2.7 times your leg length (measured from the crest of your greater trochanter to the floor).
While optimal stride length is important, I would stay away from certain exercises to try to increase it. Excessive downhill and over speed running can actually cause problems with your running technique. If the slope going downhill is too much, and if you are being pulled fast during over speed work, your legs starts to create a braking action. This is where your foot plantar flexes (toes pointed down) in front of your centre of mass to try to stop that speed. So, you are fighting yourself and stopping any speed you are trying to create. This can not only cause damage to your hamstrings, but can also create neuromuscular integration problems.
Flexibility (dynamic ranges of motion and static stretching) and strength and power training (which will also help joint stabilisation) are the best ways to reach your optimal stride length level.
Other sprinting tips/cues
• Hips tall.
• Foot strikes on forefoot and under the centre of mass.
• Ankle steps over the knee.
• Shoulders down and relaxed.
• Face and neck relaxed.
• Tight stomach, flat back, hips forward.
• The foot hits the ground a short distance in front of the centre of mass, the farther away the
foot strikes away from the centre of mass, the higher the braking force.
• Toe up – reduces hamstring fatigue.
• Heel up.
• Knee up.
• Drive with the elbows.
Sunday, August 28, 2011
Principles & Methods Of Training
Methods of training
Getting the best out of your training requires a little planning. The best training programmes are built on principles of specificity, overload, progression and reversibility.
You can also use the FITT acronym to help remember the key things to consider when tailoring programmes for individual sporting goals. It stands for; Frequency, Intensity, Time and Type. Calculating the target zone also helps assess how much aerobic or anaerobic training you need to do to improve fitness. Just don’t forget to warm down!
Principles of training

Training should be matched to an individual's needs
By using the principles of training as a framework we can plan a personal training programme that uses scientific principles to improve performance, skill, game ability and physical fitness.
A successful training programme will meet individual needs which are personal fitness needs based on age, gender, fitness level and the sport for which we are training. A successful training programme will also include exercise in the correct heart-rate target zone.
The key principles when planning a programme are:
- Specificity – training must be matched to the needs of the sporting activity to improve fitness in the body parts the sport uses.
- Overload - fitness can only be improved by training more than you normally do. You must work hard.
- Progression – start slowly and gradually increase the amount of exercise and keep overloading.
- Reversibility – any adaptation that takes place as a result of training will be reversed when you stop training. If you take a break or don’t train often enough you will lose fitness.
In planning a programme, use the FITT principles to add the detail:
- Frequency - decide how often to train.
- Intensity - choose how hard to train.
- Time - decide for how long to train.
- Type - decide which methods of training to use.
You should also consider the principle of moderation. It is important to have rest periods which allow the body to adapt. Too much training (overtraining) can lead to injury.
Training can be aerobic or anaerobic.

Aerobic training improves cardiovascular fitness. Photo courtesy of BBC Sport
- In aerobic exercise, which is steady and not too fast, the heart is able to supply enough oxygen to the muscles. Aerobic training improves cardiovascular fitness.
- Anaerobic exercise is performed in short, fast bursts where the heart cannot supply enough oxygen to the muscles. Anaerobic training improves the ability of the muscles to work without enough oxygen when lactic acid is produced.
Specific training methods can be used to improve each fitness factor.

Weight training improves muscular strength, endurance and power
- Circuit training involves performing a series of exercises in a special order called a circuit. Each activity takes place at a 'station'. It can be designed to improve speed, agility, coordination, balance and muscular endurance.
- Continuous training involves working for a sustained period of time without rest. It improves cardio-vascular fitness.
- Cross training involves using another sport or activity to improve your fitness. It happens when an athlete trains in a different environment. For example a volleyball player uses the power training for that sport to help with fitness for long jump.
- Fartlek training or 'speed play' training involves varying your speed and the type of terrain over which you run, walk, cycle or ski. It improves aerobic and anaerobic fitness.
- Interval training involves alternating between periods of hard exercise and rest. It improves speed and muscular endurance.
- Weight training uses weights to provide resistance to the muscles. It improves muscular strength (high weight, low reps), muscular endurance (low weight, high reps, many sets) and power (medium weight and reps performed quickly).
- Altitude training (AQA only) is aerobic training high above sea level, where oxygen levels are lower. It is used to increase aerobic fitness quickly.
General methods of training can be applied to specific sports. For example, continuous training might involve swimming, cycling, rowing, aerobics or running.
Calculating target zones and thresholds of training
To train effectively you must know:
- Your current level of fitness
- The amount of aerobic training you need for your sport
- The amount of anaerobic training you need for your sport
For example, sprinters use mainly anaerobic training and marathon runners use mainly aerobic training.
You can use your maximum heart rate (MHR) to calculate how hard you should work your heart to develop either aerobic or anaerobic fitness.
To calculate MHR:
- 220 - age = MHR

Improve aerobic fitness by working at 60-80% of MHR
Aerobic fitness is another way of describing cardiovascular fitness, or stamina. You can improve aerobic fitness by working in your aerobic target zone. This is found between 60-80% of your MHR. You cross your aerobic threshold, the heart rate above which you gain aerobic fitness, at 60% of our MHR.
You can improve your anaerobic fitness, which includes strength, power and muscular endurance, by working in your anaerobic target zone. This is found between 80-100% of your MHR. Anaerobic threshold is the heart rate above which you gain anaerobic fitness. You cross your anaerobic threshold at 80% of your MHR. Below 60% MHR you do not improve your aerobic or anaerobic fitness at all.
When working anaerobically you create an oxygen debt and can only keep going for a short time. Oxygen debt is the amount of oxygen consumed during recovery above that which would normally be consumed during rest. This results from a shortfall of available oxygen during exercise.
You can monitor your fitness levels by recording your recovery rate after exercise. The recovery rate is the time it takes for the pulse rate to return to normal after exercise.
Remember that percentages of MHR are approximate and personal levels of activity and fitness will cause differences in the thresholds.
Stages of a training session

Modified or conditioned games are used to improve technique. Photo courtesy of BBC Sport

Competing against team mates can be the session's main activity. Photo courtesy of BBC Sport
1. Warm-up
- Whole body exercise to raise heart rate and body temperature.
- Stretching to prepare muscles, ligaments and joints.
- Practising skills and techniques to be used in the session.
2. Main activity - this could be:
- Fitness training - which may be linked to repeated technique work.
- Skill development - drills or team practices.
- Modified or Conditioned Games.
3. Warm down (sometimes called cool down)
- Light exercise to help remove carbon dioxide, lactic acid and other waste products.
- Gentle stretching to prevent muscle soreness and stiffness later.
Power Training for Sport
Power training enables an athlete to apply the greatest amount of their maximal strength in the shortest period of time.
This is crucial for many sports men and women who will rarely be required nor have the time to produce maximal forces.
Most athletic activities involve far faster movements and far higher power outputs than are found in maximal strength exercises (4,5). An athlete can be exceptionally strong but lack significant explosive power if they are unable to apply their strength rapidly.
This article outlines the various methods of power training, their parameters and how they can be used to convert maximal strength into sport-specific power. But before examining how power training should fit into the overall strength program, it's important to have a basic understanding of the relationship between the force of movement and the velocity of movement...
The Force-Velocity Relationship
Power is intimately related to force and time, which can be expressed in the simple formula:

Traditional strength training typically alters the top half of this equation - increasing the ability to apply a maximum amount of force. But for power to be maximized the time component must also be altered. This is the aim of power training - to reduce the amount of time it takes to apply a set amount of force.
Maximum force production occurs when the speed of movement is very low (i.e. performing a one repetition maximum lift) or zero such as performing a static or isometric exercise.
Conversely, as the speed of movement increases, force decreases and at very high speeds force production is very low. Between these two extremes is an optimal point for power development. In fact, maximal power occurs at intermediate velocities when lifting moderate loads (6,7). Peak power output is typically seen when loads of 30% one repetition maximum (1-RM) are used (6,8).
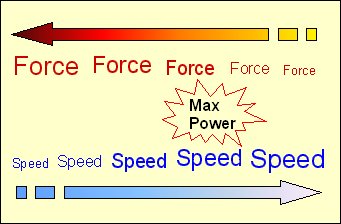
This relationship between force and velocity and its affect on power explains why an athlete can be exceptionally strong but lack significant power if they are unable to apply much of their strength over a short period of time.
Assuming an athlete has maximized his or her ability to apply force (through maximal strength training), it would be beneficial if they could train to increase the rate of force production. Increasing the rate at which strength can be generated positively alters the time aspect of the power equation above.
The goal of power training is to increase the rate of force production and there are several methods that have been devised to do this...
The Different Types of Power Training
|
|
Below are four methods of power training. A prerequisite to starting one of these routines is the development of a solid base of functional strength. Power training, particularly plyometrics and ballistics, becomes less effective and the risk of injury is increased if a phase of anatomical adaptation has not already been completed.
Heavy Strength Training
Strength training alone can increase explosive power by positively affecting the top half of the power equation or the peak force production (9,10,11). Most athletic movements also start from a stationary position and it is this early phase of moving a resistance (be it a medicine ball or bodyweight) that requires the most effort. Therefore the greater an athlete's strength is, the more explosive this initial phase of motion will be. However, once this initial inertia has been overcome less force and more speed is required to continue the movement and heavy strength training becomes less suitable.
Additionally, lifting weights of 70-100% 1-RM has also been shown to reduce the rate of force production which is counter-productive to power development (12). This may explain why in strength trained individuals heavy resistance training is less effective at increasing vertical jump performance compared to ballistics or plyometrics for example (11,13,14).
For an athlete who already has a solid base of strength training (+6 months) gains in power are minimal with further weight training (15,16). Of course, untrained individuals can significantly improve their power with weight training (15,17) and this is a safer and more favorable mode of training than some of the advanced techniques that follow.
Explosive Strength Training
Once a plateau in strength has been reached, more sport-specific types of power training are required. One of these training methods is a variation of traditional resistance training. As mentioned earlier, maximal power production occurs when moderate loads of about 30% 1-RM are used.
Completing traditional weight lifting exercises as fast as possible with relatively light loads produces in theory, the greatest power output. Unfortunately there is a problem with this approach...
Lifting a bar rapidly loaded with 30% 1-RM is difficult to execute, particularly in the final phase of the movement. The athlete must decelerate and stop the bar in order to keep it under control (18,19). This deceleration activates the antagonist muscles negatively affecting power output and hinders the required adaptations (11,20).
Ballistics and plyometrics avoid this problem, as there is no deceleration. The athlete is free to jump as high as possible or throw an object as far as possible without restricting the movement.
If free weights exercises are used for power training, loads of 75-85% are recommended (1,8,11) for sets of 3-5 repetitions. The parameters for explosive strength training can be seen in the table below:
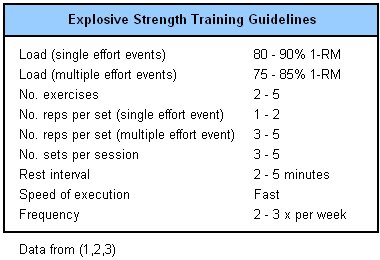
For single power efforts such as the throwing events in athletics, a higher load (80-90% 1-RM) can be used for a smaller number of repetitions (1-2). A multiple power effort sport includes sprinting,team sports or any event that requires repeated efforts.
Sets are not performed to exhaustion as the quality and speed of each lift is the most important factor. Rest intervals are also kept high for the same reason.
Ballistics
During a ballistic action, the force far outweighs the resistance so movement is of a high velocity. The resistance is accelerated and projected. Examples include a medicine ball throw and a jump squat. The aim is to reach peak acceleration at the moment of release projecting the object or body as far as possible.
While there is no definitive guidelines for the resistance used with ballistics, Fleck and Kraemer (3) suggest a load of 30-35% 1-RM should be used for exercises that include free weights such as jump squats. For many ballistic exercises the weight of the objects themselves dictate the load i.e. medicine balls ranging from 2-6kg (4.4-13lbs) and kettlebells ranging from 10-32kg (22-70lbs).
Parameters for ballistic power training are summarized in the table below:
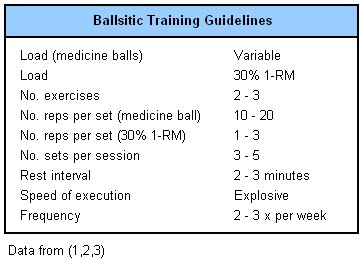
Repetitions can be reasonably high as the nature of some exercises means there can be up to 20 seconds between efforts - for example when a medicine ball has to be retrieved. A set should stop however, the moment the speed and quality of movement can no longer be maintained.
For exercises such as jump squats that use 30% 1-RM loads, Fleck and Kraemer (3) recommend up to 5 sets of 3 repetitions with 3 minutes rest between sets.
Ballistics can place considerable eccentric forces on joints, ligaments and tendons when landing from a jump squat for example. Athletes should always progress gradually from unloaded to loaded exercises and must not be fatigued before starting a ballistic power training session.
Plyometrics
Plyometric drills involve a quick, powerful movement using a pre-stretch or counter-movement that involves the stretch shortening cycle (1). Classical plyometric exercises include various types of jump training and upper body drills using medicine balls.
Plyometrics is a suitable form of power training for many team and individual sports. While many might see it simply as jumping up and down, there are important guidelines and program design protocols that need to be followed if plyometrics is to be as safe and effective as possible. For this reason, and due to its popularity plyometrics has its own section of the website...
For full plyometric guidelines and sample sessions see the plyometric training section of the website.
Which is The Best Form of Power Training?
The type of power training employed must be the most specific to the sport or event. Olympic lifts, such as power cleans, may be suitable for sports such as football and rugby. Some plyometric exercises are suitable for soccer and hockey. Ballistic exercises with medicine balls fit well with basketball and volleyball.
But many sports would benefit from a combination of power training methods. Take basketball for example - explosive strength training such as power cleans, plyometric exercises such as depth jumps and ballistics such as jump squats and overhead medicine ball throws would all be suitable choices.
Interestingly, a study measuring the effects of three types of power training found that all of them increased vertical jump performance. However, while traditional weight training lead to a 5% increase and plyometrics a 10% increase, the most effective was ballistic jump squats, which lead to an 18% improvement in jump height (11). This confirmed the findings of a similar earlier study (14).
Does this mean ballistics is superior to other forms of power training? Not necessarily. In this case it may be that jump squats was the most specific to the performance outcome.
How to Improve Your Sprinting Technique
By breaking sprinting technique into its component parts you can focus on and improve specific phases of the action. Good sprinting technique has some of the following characteristics (1):
START PHASE
i) Bodyweight evenly distributed over four contact points in the start position (i.e. hands and knees). Front knee angle is ~90o, rear knee angle ~100-130o.
ii) Explosive push off with both legs. Front leg extends remaining in contact with the ground while back leg swings forward. Extended front leg and trunk form a straight line.
iii) Arms swing opposite to legs, elbows flex to ~90o and fists swing towards forehead.

ACCLERATION PHASE
iv) After first two strides, foot touches down in front of center of gravity.
v) Forward body lean begins to decrease until normal sprinting position is reached after about 22 yards (20 meters). Head is relaxed, eyes focused straight ahead.

MAXIMUM SPEED PHASE
vi) Push-off angle from ground is ~50-55o. Trunk is almost erect with ~5o forward lean.
vii) (Midflight) Push-off leg folds tightly towards buttocks in a relaxed heeling motion. Front leg thrusts forward and upward at maximum speed (~44mph in elite sprinters). When front thigh reaches maximum possible knee lift, lower leg swings forward in a relaxed movement.
viii) Foot meets ground with ankle slightly extended (plantar flexion) directly under center of gravity. Bodyweight is balanced so that only the ball of the foot touches the ground.
ix) Shoulders remain steady, elbows flexed at ~90o, kept close to body throughout all phases. Hands swing forward and up above shoulder height, down and past hips. Arms and hands should have an aggressive hammering action. Head aligns naturally with trunk and shoulders and facial/neck muscles are relaxed by keeping the mouth slightly open.

Sprinting Technique Program
These sprinting technique drills can be performed in this order or alternatively focus on just 3-4 drills. There is no need to perform multiple sets and repetitions.
Raise Knees: 10 meters - jog - 10 meters - rest
Sprint 10 meters concentrating on raising knees as higher than normal. Jog for 10 meters and then sprint for 10 meters and rest.
Fast Knee Pick Ups: 10 meters - jog - 10 meters - rest
Jogging on the spot raise your knees to waist height while emphasising arm action. Move forward 10 meters with this action concentrating on the number of ground contacts rather than how fast you cover the distance. Try to get as many ground contacts as possible.
Flicks: 10 meters - jog - 10 meters - rest
While sprinting over 10 meters concentrate on flicking your heels up to touch your butt.
Leg Speed: 60 meters
This is a normal sprint over 60 meters except all of your focus should be on your legs. Try to gauge the optimum leg speed for you by taking different stride lengths to see which yields the best results.
Skipping: 40 meters
High Hops: 3 x 40 meters
Bound from one foot to the other. The action is similar to skipping except your are trying to gain as much height as possible and stay in the air for as long as possible. Remember to recover fully between attempts.
Elbow Drive: 40 meters
Sprint for 40 meters concentrating on driving your elbow in a straight line. Keep your elbows flexed at right angles while keeping your arms relaxed.
How to Improve Your Sprinting Technique
By breaking sprinting technique into its component parts you can focus on and improve specific phases of the action. Good sprinting technique has some of the following characteristics (1):
START PHASE
i) Bodyweight evenly distributed over four contact points in the start position (i.e. hands and knees). Front knee angle is ~90o, rear knee angle ~100-130o.
ii) Explosive push off with both legs. Front leg extends remaining in contact with the ground while back leg swings forward. Extended front leg and trunk form a straight line.
iii) Arms swing opposite to legs, elbows flex to ~90o and fists swing towards forehead.
ACCLERATION PHASE
iv) After first two strides, foot touches down in front of center of gravity.
v) Forward body lean begins to decrease until normal sprinting position is reached after about 22 yards (20 meters). Head is relaxed, eyes focused straight ahead.
MAXIMUM SPEED PHASE
vi) Push-off angle from ground is ~50-55o. Trunk is almost erect with ~5o forward lean.
vii) (Midflight) Push-off leg folds tightly towards buttocks in a relaxed heeling motion. Front leg thrusts forward and upward at maximum speed (~44mph in elite sprinters). When front thigh reaches maximum possible knee lift, lower leg swings forward in a relaxed movement.
viii) Foot meets ground with ankle slightly extended (plantar flexion) directly under center of gravity. Bodyweight is balanced so that only the ball of the foot touches the ground.
ix) Shoulders remain steady, elbows flexed at ~90o, kept close to body throughout all phases. Hands swing forward and up above shoulder height, down and past hips. Arms and hands should have an aggressive hammering action. Head aligns naturally with trunk and shoulders and facial/neck muscles are relaxed by keeping the mouth slightly open.
Sprinting Technique Program
These sprinting technique drills can be performed in this order or alternatively focus on just 3-4 drills. There is no need to perform multiple sets and repetitions.
Raise Knees: 10 meters - jog - 10 meters - rest
Sprint 10 meters concentrating on raising knees as higher than normal. Jog for 10 meters and then sprint for 10 meters and rest.
Fast Knee Pick Ups: 10 meters - jog - 10 meters - rest
Jogging on the spot raise your knees to waist height while emphasising arm action. Move forward 10 meters with this action concentrating on the number of ground contacts rather than how fast you cover the distance. Try to get as many ground contacts as possible.
Flicks: 10 meters - jog - 10 meters - rest
While sprinting over 10 meters concentrate on flicking your heels up to touch your butt.
Leg Speed: 60 meters
This is a normal sprint over 60 meters except all of your focus should be on your legs. Try to gauge the optimum leg speed for you by taking different stride lengths to see which yields the best results.
Skipping: 40 meters
High Hops: 3 x 40 meters
Bound from one foot to the other. The action is similar to skipping except your are trying to gain as much height as possible and stay in the air for as long as possible. Remember to recover fully between attempts.
Elbow Drive: 40 meters
Sprint for 40 meters concentrating on driving your elbow in a straight line. Keep your elbows flexed at right angles while keeping your arms relaxed.
Tuesday, August 16, 2011
LYON WINS 2015 !
Lyon wins the 2015 World Master Athletics Championship !
http://www.lyon2015.com/the-world-master-athletics-championship-in-2015/
These championships are an opportunity for the French Athletic to demonstrate its international event know-how in this region as during the World Cross-country Championships (1990, 2005), the European Cup (2002, 2008), the World Junior Championships (1998) and many French National Athletics Championships.
Dynamism and beauty of the region makes Lyon city a famous place, in the top three of the most attractive cities in Europe. Numerous shows and international events take place in Lyon thanks to easy transport and accommodation quality.
Lyon 2015 has the support from the French Ministry of Sports, the City of Lyon and all local institutions as well as private partners, strongly involved and motivated by the project.
Our presence during the European Masters Indoor Championships in Ghent (BELGIUM), the European Non-Stadia Championships in Thionville (FRANCE) and recently the World Masters Athletics Championships in Sacramento (USA) has reveal a huge interest from the athletes to compete in Lyon.
We are very grateful for this support, which is a guarantee of success and participation. We are happy to host athletes of all around the world.
A bientôt à Lyon !
Marcel FERRARI
President of LOC
Perth wins for 2016!
http://www.perth2016.com/articles/news/perth-wins-for-2016Perth has won its bid to host the 2016 World
Masters Athletics Championships!
The announcement was made on 14 July 2011 following a vote by the World Masters Athletics General Assembly in Sacramento, USA.
Perth had bid for the 2015 championships however following changes to the World Masters Athletics constitution two championships were up for grabs with Western Australia winning the 2016 event.
The changes mean that following the 2015 event the championships will be held every even numbered year, starting with 2016, instead of the current odd-year schedule.
Lyon, France will host the 2015 event.
The bidding process has been a collaborative effort between Eventscorp, Masters Athletics Australia, Masters Athletics Western Australia, Athletics Western Australia, Athletics Australia, the Department of Sport and Recreation and VenuesWest.
It is proposed the championships would be held in October 2016, at a range of venues including the superior WA Athletics Stadium, which has been designed to international competition standards and opened two years ago.
A big thank you to Glenn Hamilton, Richard and Barbara Blurton, Lynne and Bob Schickert, the volunteers in Sacramento and all those involved with the bid.
The World Masters Athletics Championships was last held in Australia in 2001 when Brisbane hosted the event.
Perth, Western Australia would like to extend an invitation to all masters athletes from around the world to come and experience an extraordinary championship in 2016.
Paul Su
Sent from my iPad
Sent from my iPad
Subscribe to:
Posts (Atom)